本文章由语雀编写
「语雀」是一个「知识创作工具」,孵化自 蚂蚁金服 ,是 体验科技 理念下的一款创新产品,已是 5 万 + 阿里员工进行文档编写、知识沉淀的标配。博主本来就是语雀的用户,偶然发现下了 elog,可以将语雀的文章同步到本地。用语雀写作除了能够即使渲染之外,并且图床也不用考虑了。废话不多说了下面开始教程。
迁移博客文章到语雀#
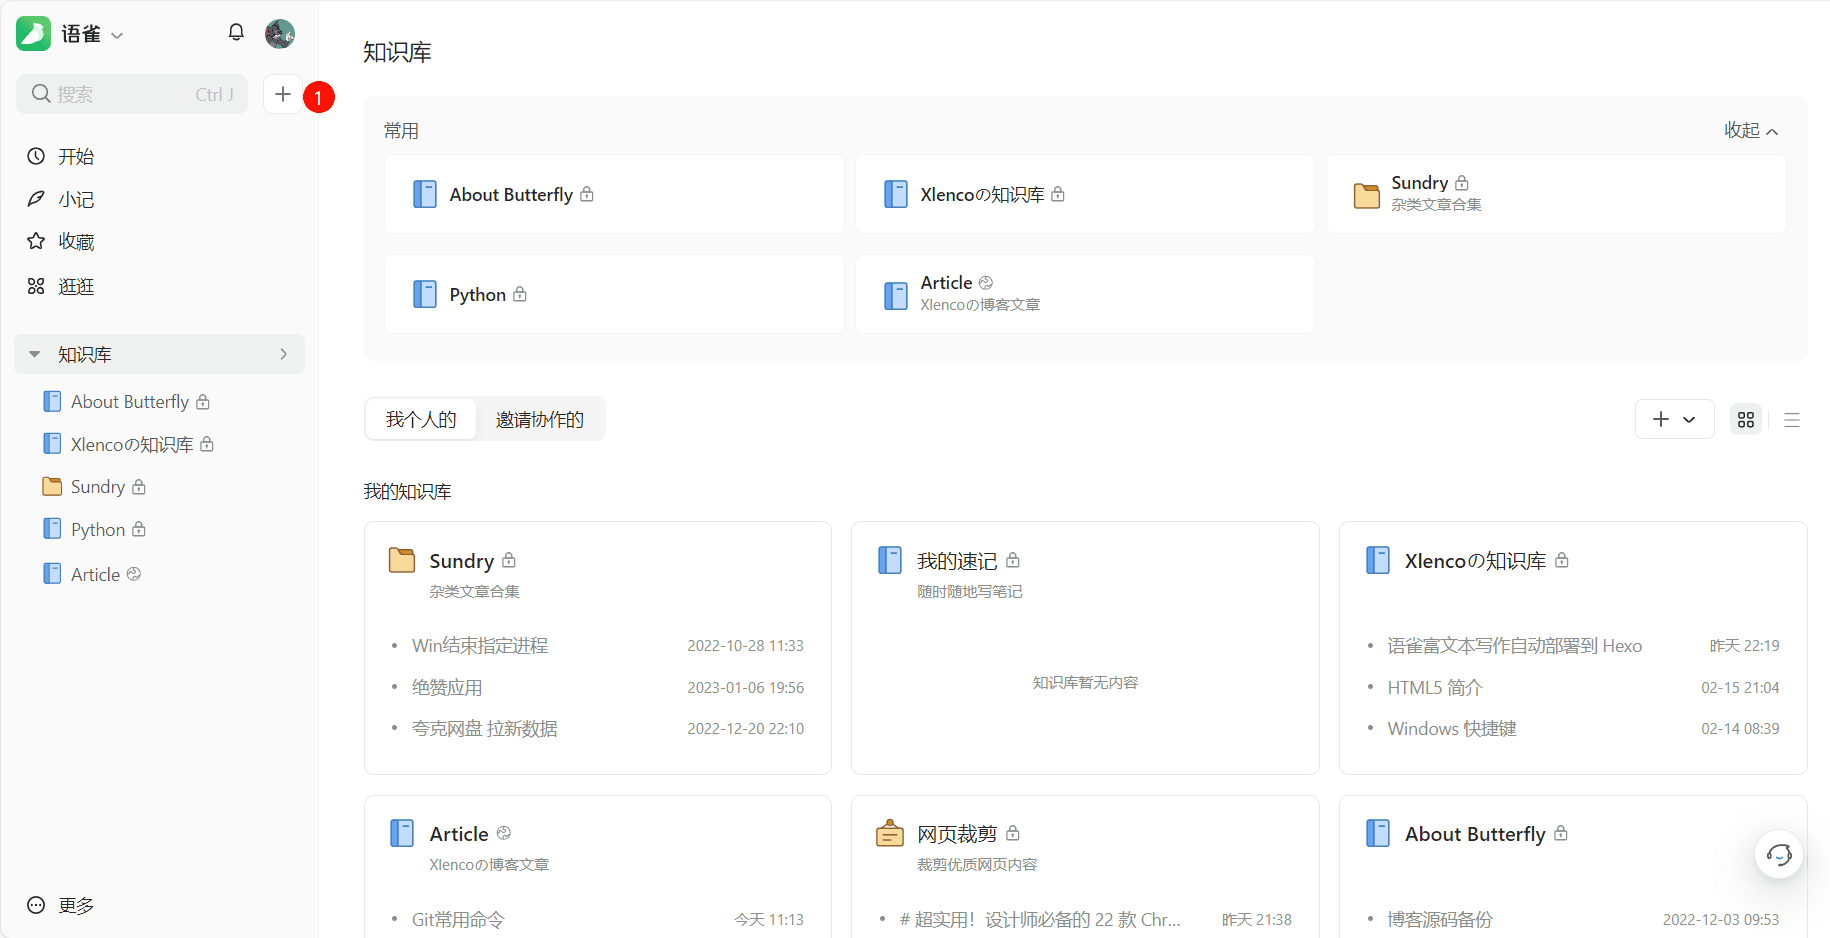
打开语雀官网进入首页,点击左上角加号
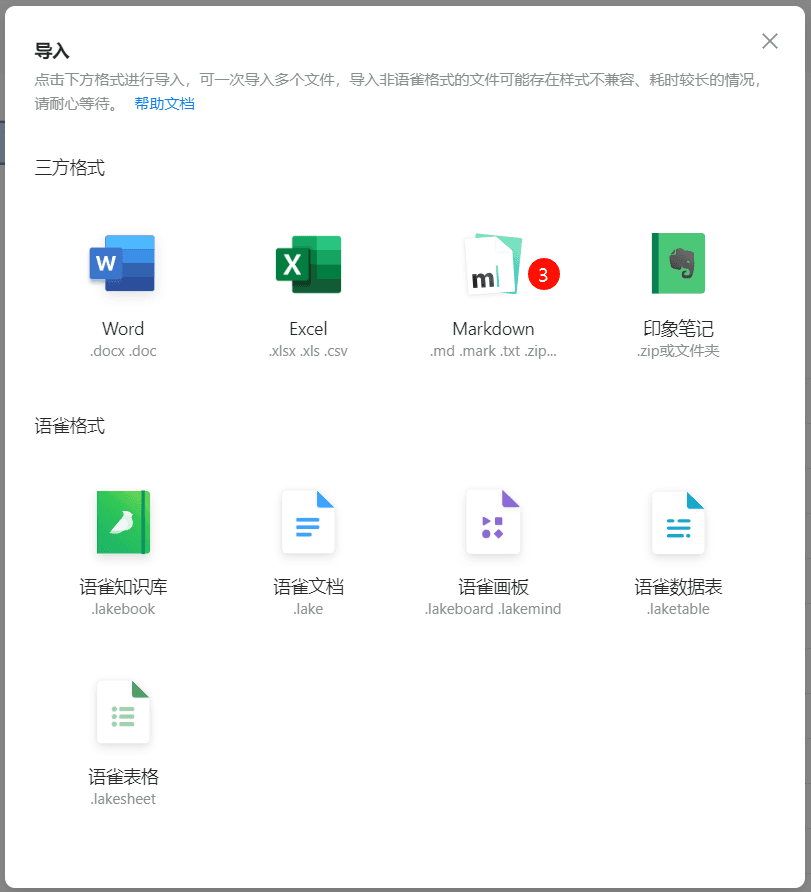
其次点击导入

然后选择markdown格式
最后在 markdown 导入配置中选择markdown打包后的压缩文件
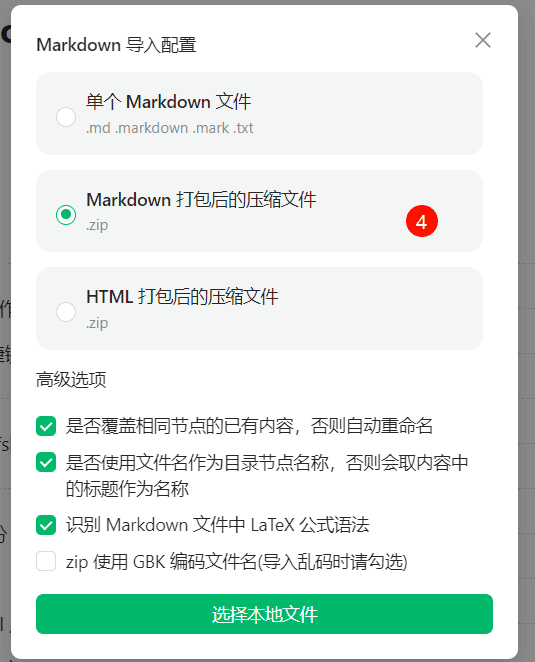
导入完成后文件的 Front-matter 有点乱建议自己手动更改下
安装 Elog#
首先,你需要使用 npm/cnpm/yarn /pnpm 全局安装 @elog/cli
# 使用 npm 安装 CLI
npm install @elog/cli -g

# 使用cnpm 安装 CLI
cnpm install @elog/cli -g


# 使用 yarn 安装 CLI
yarn global add @elog/cli

# 使用 pnpm 安装 CLI
pnpm install @elog/cli -g

# 安装指定版本
npm install @elog/[email protected] -g

# 也可使用 npx 运行 elog 的所有命令:将本文档使用 elog 命令的地方换成 npx @elog/cli
# 例如
# 初始化 elog 配置文件
npx @elog/cli init
# 本地同步命令
npx @elog/cli sync -e .elog.env
# 清除本地缓存
npx @elog/cli clean
配置 package.json#
将 @elog/cli 安装到 package.json
npm i @elog/cli
或者
cnpm i @elog/cli
或者
yarn add @elog/cli
或者
pnpm i @elog/cli
初始化#
进入 Hexo 根目录下,使用命令进行初始化:
elog init
根据提示初始化成功后,会在根目录生成一份 elog.config.js 配置文件和本地调试用的.elog.env 环境变量配置文件。
配置 Elog#
官方文档提供两种配置方式 yuque(Token 方式)和 yuque-pwd(账号、密码方式)
如果你是语雀的会员建议选择 yuque(Token 方式,反之则选择 yuque-pwd(账号、密码方式)
编辑你的 elog.config.js 文件#
module.exports = {
  write: {
    platform: 'yuque-pwd', // 填yuque或yuque-pwd
    yuque: {
      token: process.env.YUQUE_TOKEN, // 以下三行配置不用动,配置都写在.elog.env
      login: process.env.YUQUE_LOGIN,
      repo: process.env.YUQUE_REPO,
      onlyPublic: false,
      onlyPublished: true,
    },
    'yuque-pwd': {
      username: process.env.YUQUE_USERNAME,
      password: process.env.YUQUE_PASSWORD,
      login: process.env.YUQUE_LOGIN,
      repo: process.env.YUQUE_REPO,
      linebreak: false,
      onlyPublic: false,
      onlyPublished: true,
    },
    notion: {
      token: process.env.NOTION_TOKEN,
      databaseId: process.env.NOTION_DATABASE_ID,
      filter: false, // {property: 'status', select: {equals: '已发布'}}
    },
    feishu: {
      type: 'space',
      wikiId: process.env.FEISHU_WIKI_ID,
      folderToken: process.env.FEISHU_FOLDER_TOKEN,
      appId: process.env.FEISHU_APP_ID,
      appSecret: process.env.FEISHU_APP_SECRET,
    },
    flowus: {
      tablePageId: process.env.FLOWUS_TABLE_PAGE_ID,
      filter: false, // {property: 'status',value: '已发布'}
    }
  },
  deploy: {
    platform: 'local',
    local: {
      outputDir: './source/_posts/yuque',  \\ 文件同步目录
      filename: 'title',
      format: 'matter-markdown', \\ md文件带上Front-matter
    },
    halo: {
      endpoint: process.env.HALO_ENDPOINT,
      token: process.env.HALO_TOKEN,
      policyName: process.env.HALO_POLICY_NAME,
      rowType: 'html',
      needUploadImage: true,
    },
    confluence: {
      user: process.env.CONFLUENCE_USER,
      password: process.env.WORDPRESS_PASSWORD,
      endpoint: process.env.WORDPRESS_ENDPOINT,
      spaceKey: process.env.CONFLUENCE_SPACE_KEY,
      rootPageId: process.env.CONFLUENCE_ROOT_PAGE_ID, // 可选
    },
    wordpress: {
      username: process.env.WORDPRESS_USERNAME,
      password: process.env.WORDPRESS_PASSWORD,
      endpoint: process.env.WORDPRESS_ENDPOINT,
    }
  },
  image: {
    enable: false,
    platform: 'local',
    local: {
      outputDir: './docs/images',
      prefixKey: '/images',
      pathFollowDoc: false,
    },
    oss: {
      secretId: process.env.OSS_SECRET_ID,
      secretKey: process.env.OSS_SECRET_KEY,
      bucket: process.env.OSS_BUCKET,
      region: process.env.OSS_REGION,
      host: process.env.OSS_HOST,
      prefixKey: '',
    },
    cos: {
      secretId: process.env.COS_SECRET_ID,
      secretKey: process.env.COS_SECRET_KEY,
      bucket: process.env.COS_BUCKET,
      region: process.env.COS_REGION,
      host: process.env.COS_HOST,
      prefixKey: '',
    },
    qiniu: {
      secretId: process.env.QINIU_SECRET_ID,
      secretKey: process.env.QINIU_SECRET_KEY,
      bucket: process.env.QINIU_BUCKET,
      region: process.env.QINIU_REGION,
      host: process.env.QINIU_HOST,
      prefixKey: '',
    },
    upyun: {
      user: process.env.UPYUN_USER,
      password: process.env.UPYUN_PASSWORD,
      bucket: process.env.UPYUN_BUCKET,
      host: process.env.UPYUN_HOST,
      prefixKey: '',
    },
    github: {
      token: process.env.GITHUB_TOKEN,
      user: process.env.ELOG_GITHUB_USER,
      repo: process.env.ELOG_GITHUB_REPO,
      prefixKey: '',
    }
  }
}
配置.elog.env 文件#
为了防止此文件在 Git 上传中泄露建议在.gitignore 中添加.elog.env
具体配置看你的设置方式
下面直接引入官方的文档说明
语雀(Token 方式)#
注意:根据语雀定价调整,此方式需要语雀高级会员可用,以前生成过 token 的账户依旧可用
语雀关键信息获取及配置流程请移步 关键信息获取 页面。
| 字段 | 必填 | 说明 | 默认值 |
|---|---|---|---|
| token | 是 | 语雀 Token | - |
| baseUrl | 否 | 语雀 API 请求的 Base Url | https://www.yuque.com/api/v2 |
| login | 是 | 个人路径 / 空间 ID | - |
| repo | 是 | 语雀仓库短名称,也称为语雀知识库路径 | - |
| onlyPublic | 否 | 是否只获取公开文章 | false |
| onlyPublished | 否 | 是否只获取已发布文章 | false |
| limit | 否 | 文档下载并发数 | 3 |
baseUrl 为语雀 API 请求路径
当知识库类型为个人知识库时,无需配置。
当知识库类型为团队知识库时,baseUrl=https:// 空间 id.yuque.com/api/v2,login = 空间 id,repo = 空间中的语雀知识库路径
语雀(账号密码方式)#
此方式无需语雀会员也可用
注意:在非国内 CI/CD 环境中使用此方式,例如 Github Workflow,会导致语雀后台登录设备中出现大量美国 IP,目前尚不清楚语雀是否会有安全限制措施,请谨慎使用。推荐本地同步时使用。
语雀关键信息获取及配置流程请移步 关键信息获取 页面。
| 字段 | 必填 | 说明 | 默认值 |
|---|---|---|---|
| username | 是 | 语雀帐号,一般是手机号 | - |
| password | 是 | 语雀密码,可在设置进行绑定 | |
| host | 否 | 语雀域名 / 团队域名 | https://www.yuque.com |
| login | 是 | 个人路径 / 空间 ID | - |
| repo | 是 | 语雀仓库短名称,也称为语雀知识库路径 | - |
| linebreak | 否 | 是否保持语雀的换行 | false |
| onlyPublic | 否 | 是否只获取公开文章 | false |
| onlyPublished | 否 | 是否只获取已发布文章 | false |
| limit | 否 | 文档下载并发数 | 3 |
host 为语雀域名
当知识库类型为个人知识库时,无需配置。
当知识库类型为团队知识库时,host=https:// 空间 id.yuque.com
开始同步#
配置完成后在根目录下,执行本地同步命令:
elog sync -e .elog.env
自动化流程#
语雀 + webhooks + serverless api + GitHub Actions + Github Pages 持续集成
 这里引用官方文档的内容
#
Github Actions#
- 在仓库的 Settings 中的 Secrets and variables-Actions-Secrets 中进行配置需要用到的环境变量
| GITHUBTOKEN | 你的 Github Token |
|---|---|
| YUQUE_REPO | 你的语雀知识库路径 |
| YUQUE_LOGIN | 你的语雀账号名(路径) |
| YUQUE_USERNAME | 你的手机号 |
| YUQUE_PASSWORD | 你的语雀密码 |
如何你使用的是语雀(Token 方式)可将 YUQUE_USERNAME,YUQUE_PASSWORD 换成 YUQUE_TOKEN
- 在仓库根目录创建.github/workflows/Deploy Yuque-Hexo Public To Pages 文件,并按照以下流程配置
name: Deploy Yuque-Hexo Public To Pages

on:
  # 允许手动push触发
  push:
    branches:
      - main
  # 允许外部仓库事件触发
  repository_dispatch:
    types:
			# api中的event_type就是这个
      - deploy

jobs:
  build:
    runs-on: ubuntu-latest

    steps:
      - name: 检查分支
        uses: actions/checkout@master

      - name: 安装node环境
        uses: actions/setup-node@master
        with:
          node-version: "16.x"

      - name: 安装Hexo并使用elog
        run: |
          export TZ='Asia/Shanghai'
          npm install hexo-cli -g
          npm install
          npm run elog
          hexo generate

      - name: 拉取语雀文章
        env:
          # 语雀相关环境变量
          YUQUE_TOKEN: ${{ secrets.YUQUE_TOKEN }}
          YUQUE_USERNAME: ${{ secrets.YUQUE_USERNAME }}
          YUQUE_PASSWORD: ${{ secrets.YUQUE_PASSWORD }}
          YUQUE_LOGIN: ${{ secrets.YUQUE_LOGIN }}
          YUQUE_REPO: ${{ secrets.YUQUE_REPO }}
        run: |
          # 对应package.json中的script.sync
          elog sync -e .elog.env

      - name: 配置Git用户名邮箱
        run: |
          git config --global user.name "xxxx"
          git config --global user.email "xxxx"

      - name: 提交yuque拉取的文章到GitHub仓库
        run: |
          echo `date +"%Y-%m-%d %H:%M:%S"` begin > time.txt
          git add .
          git commit -m "更新文档" -a

      - name: 推送文章到仓库
        uses: ad-m/github-push-action@master
        with:
          github_token: ${{ secrets.secrets.GITHUBTOKEN }}


      - name: 部署到Github Pages       #此处master:master 指从本地的master分支提交到远程仓库的master分支,若远程仓库没有对应分支则新建一个。如有其他需要,可以根据自己的需求更改。
        run: |
          cd ./public
          git init
          git add .
          git commit -m "${{ github.event.head_commit.message }} $(date +"%Z %Y-%m-%d %A %H:%M:%S") Updated By Github Actions"
          git push --force --quiet "https://${{ github.repository_owner }}:${{ secrets.GITHUBTOKEN }}@github.com/${{ github.repository_owner }}/${{ github.repository_owner }}.github.io.git" master:master
访问 serverless api 可触发 action 部署
serverless api#
为了方便,这里提供一个部署在 Vercel 的免费公用的ServerlessAPI
将其填入语雀 Webhooks 中即可
未开通会员的语雀小伙伴可直接手动调用此 API 触发 Github Actions 进行自动化构建 & 部署
https://serverless-api-elog.vercel.app/api/github?user=xxx&repo=xxx&event_type=xxx&tok
语雀 webhooks#
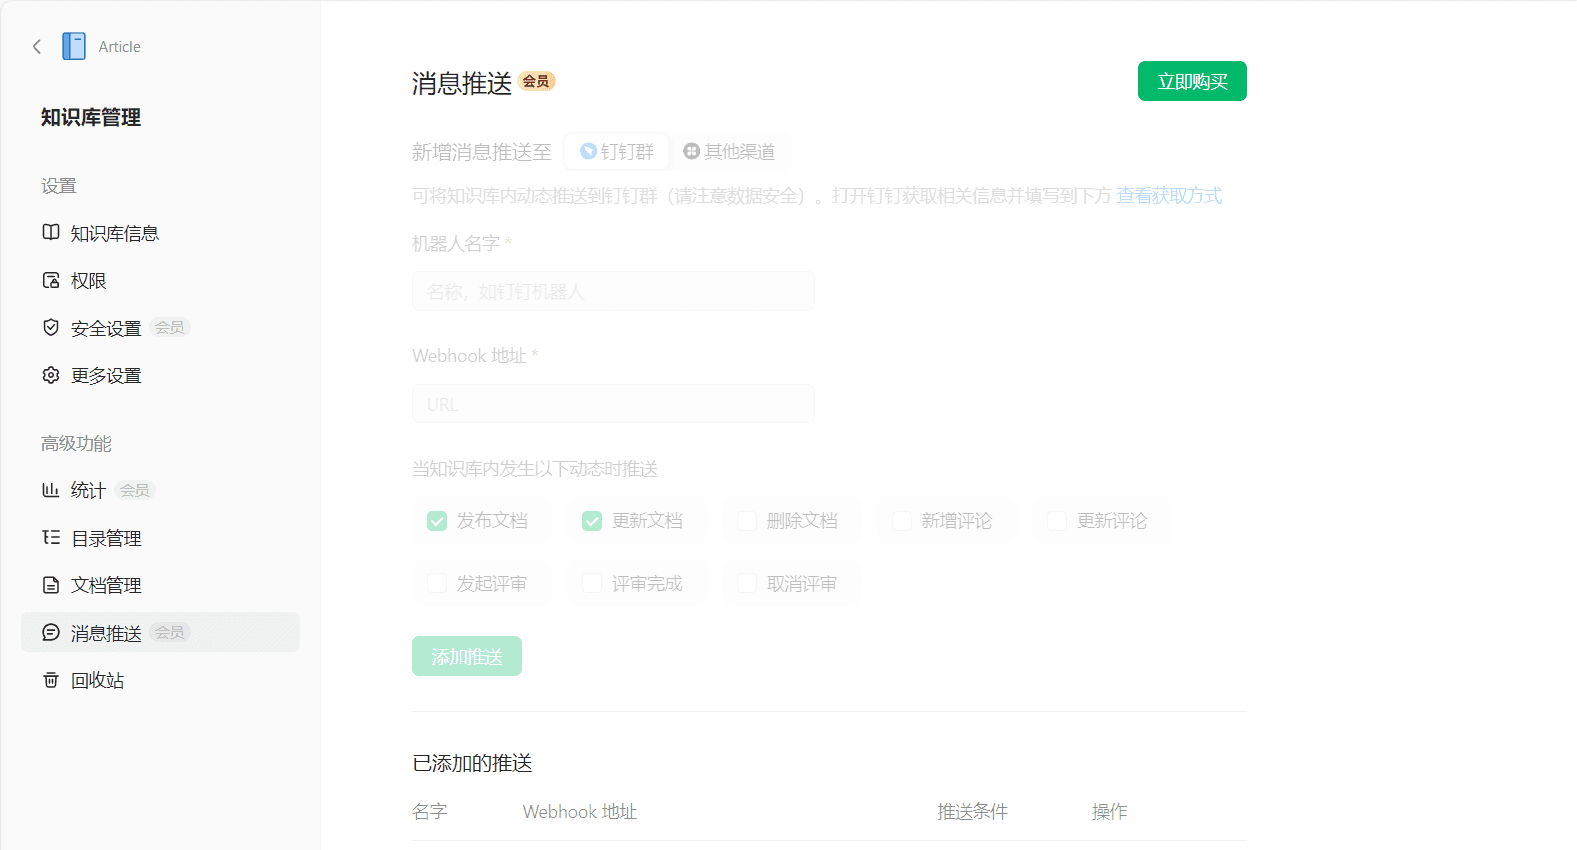
在语雀知识库 - 更多设置 - 消息推送中可配置语雀 webhooks,填写一个支持 POST 请求的 APi 链接即可(这里以 serverless api 为例)。当文档更新时,语雀会调用这个 API 进行推送
令人遗憾的是,语雀将 webhooks 收费了
未开通会员的语雀小伙伴可直接手动调用 API 触发 Github Actions 进行自动化构建 & 部署
知识库配置了「自动发布」功能后,文档的 更新 / 发布 操作暂不会发送 webhooks